
After three decades as custom aquarium builders installing systems in Los Angeles and Orange County’s most prestigious homes, Fish By Design has developed comprehensive technical specifications that allow architects to integrate luxury aquarium installations confidently into their projects. This guide provides the essential engineering and coordination data needed to specify aquarium installations correctly from the start.
In This Article
Structural Load Requirements
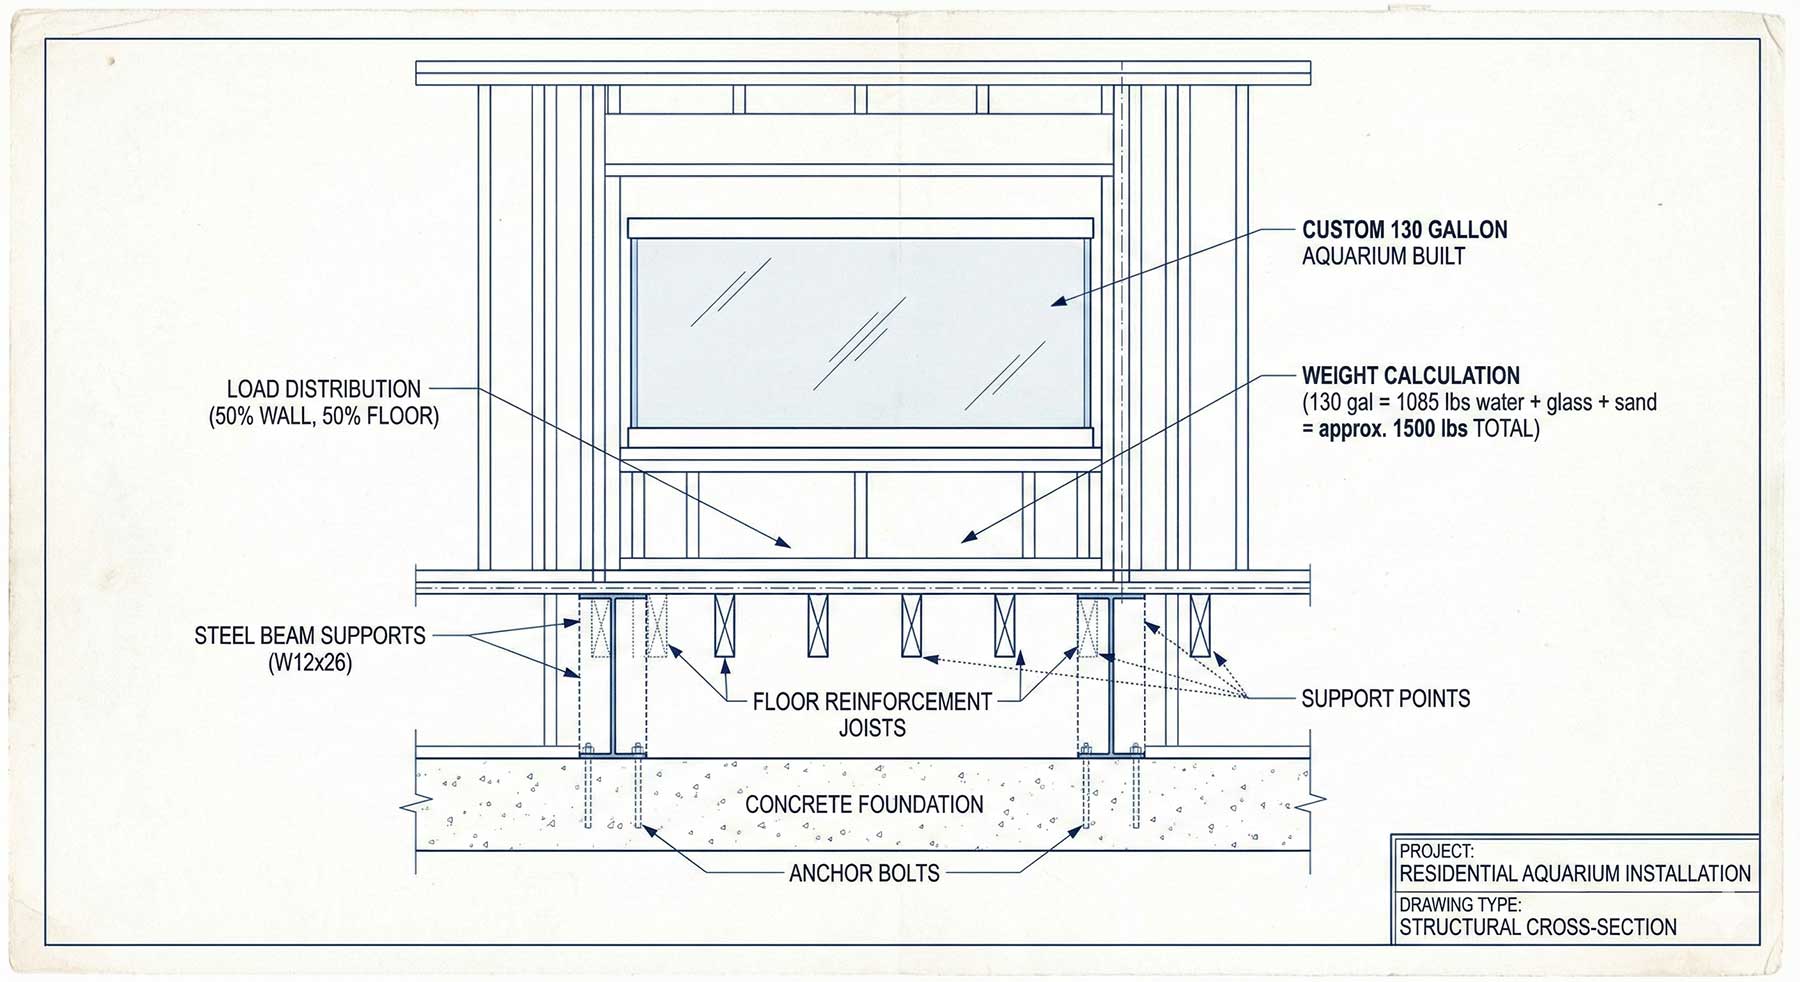
Engineered floor system supporting large-scale aquarium installation
Floor Load Distribution and Support Details
Beyond raw load calculations, understanding how custom aquarium installation distributes weight to the supporting structure affects detailing decisions. Most aquarium installations use a base structure—typically a steel frame or reinforced platform—that distributes the aquarium’s weight across a defined footprint. This base becomes the interface between the aquarium and the building structure.The base structure serves multiple functions. It creates a level, stable platform for the aquarium itself, distributes load appropriately to floor framing, and provides routing for plumbing and electrical connections. The base dimensions typically extend beyond the aquarium footprint by 6-12 inches on all sides, spreading the load over a larger area and providing working room for installation and connections.For installations in finished spaces where the base structure is visible, architectural detailing becomes important. The base can be finished with materials matching the surrounding floor, creating a subtle plinth that elevates the aquarium slightly. Alternatively, it might be designed as a distinct architectural element—stone, tile, or metal finishes that complement the aquarium and relate to other design elements in the space. These aesthetic considerations should be coordinated between the architect, interior designer, and Fish By Design during the design phase.Aquarium installations that span between rooms or serve as room dividers require special consideration. Without supporting walls on one or both sides, all load must be carried by floor framing and transmitted to bearing walls or columns some distance away. This typically requires engineered beam systems, often steel, sized to carry concentrated loads over longer spans. The beam structure must be coordinated with ceiling design, HVAC routing, and other systems in the spaces below.Plumbing System Requirements
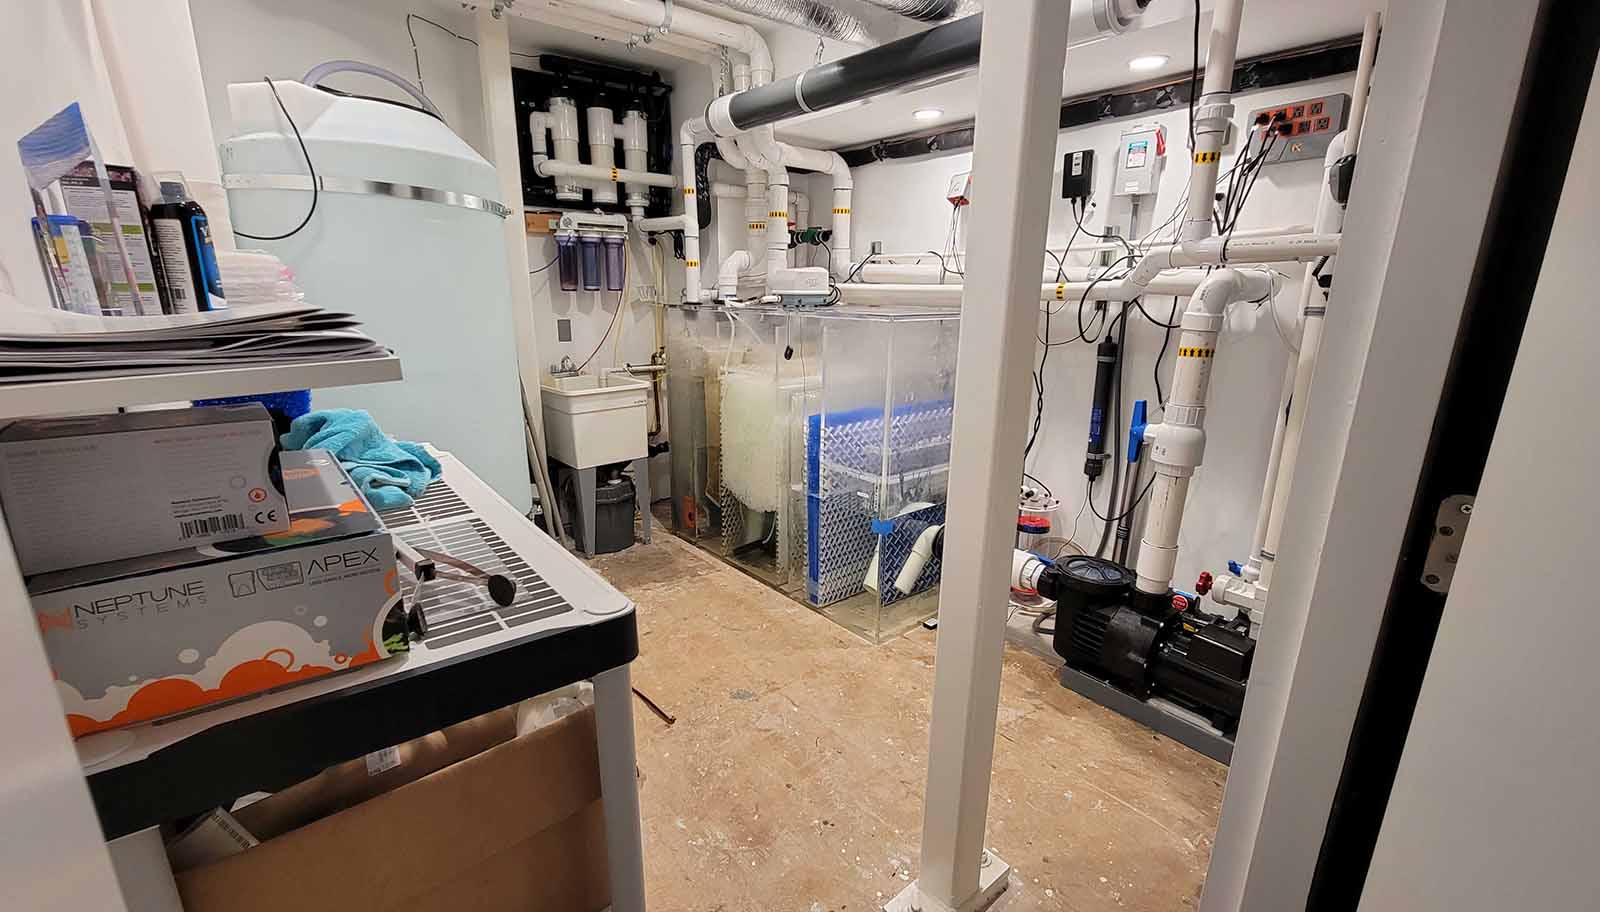
Large custom aquarium installation projects rely on remote filtration systems, which means dedicated plumbing connections that must be integrated into the building’s infrastructure. These are not trivial connections—we’re talking about systems that circulate hundreds to thousands of gallons per hour, with multiple supply and return lines plus drainage provisions.A typical remote filtration system requires several plumbing connections. Supply and return lines move water between the aquarium and the filtration equipment—usually 1.5″ to 2″ diameter pipes capable of handling high flow rates with minimal friction loss. These lines must be routed invisibly through floor systems or wall cavities, with careful attention to maintaining slope for proper drainage when the system is shut down.Drainage is critical and often underestimated. Any aquarium requires regular water changes and occasional complete drainage for maintenance or emergencies. The filtration equipment room needs floor drains capable of handling high flow rates. Additionally, overflow protection—plumbing that handles excess water if the system malfunctions—should be incorporated. This typically means oversized drain lines with adequate capacity and routing that doesn’t allow water to back up into living spaces.Fresh water supply serves the automated top-off system that replaces water lost to evaporation. Large reef aquariums can lose 5-10 gallons daily to evaporation, so a reliable fresh water source with appropriate filtration is essential. This usually means dedicating a cold water line with accessible shut-off valves and ideally an inline filter system to remove chlorine and other contaminants. Some installations incorporate reverse osmosis systems within the equipment room for optimal water quality.All plumbing should be specified with appropriate materials. PVC is standard for supply and return lines, with schedule 40 or schedule 80 depending on pressure requirements. Drainage uses similar materials but must be sized generously to handle maximum potential flow. Connections should use union fittings at strategic locations to allow for future service without requiring cutting. Ball valves at key points allow isolation of different system sections for maintenance.The plumbing design should be coordinated carefully with structural engineering. Large-diameter supply and return lines passing through floor joists require appropriately sized and located holes that don’t compromise structural integrity. This coordination happens during design development, with locations and sizes marked on structural drawings so the framers incorporate them correctly during construction.Electrical System Specifications
Modern aquarium design requires electrically intensive systems, with substantial dedicated circuits and careful coordination with the home’s electrical design. Architects and electrical engineers should plan for these requirements during the design phase to avoid undersized panels or inadequate circuit provisioning.A large reef aquarium installation typically requires 240V service for major equipment. Heaters and chillers, which maintain precise water temperature, draw significant power and benefit from 240V operation. A single dedicated 240V circuit (typically 30-50 amps depending on system size) should be provided to the equipment room. This circuit powers the environmental control systems that are critical to marine life health.Additional 120V circuits serve lighting systems, circulation pumps, control systems, and accessories. Plan for at least two dedicated 20-amp circuits for equipment rooms, plus one or two additional circuits for the aquarium location itself to power lighting and any integrated display systems. These circuits should be on separate breakers from other household systems to ensure aquarium equipment isn’t affected by tripped breakers from unrelated loads.Power conditioning deserves consideration. Aquarium control systems and lighting often benefit from clean, stable power. In areas prone to power fluctuations or where the electrical supply is variable, incorporating surge protection or even a dedicated UPS system can protect valuable equipment and livestock. For the most critical installations, backup power systems ensure life support continues during outages—a consideration worth discussing with clients given the investment in both equipment and livestock.Control systems are increasingly sophisticated, often integrating with home automation platforms. Wiring provisions should accommodate network connectivity to equipment rooms—either hardwired Ethernet or ensuring strong WiFi coverage. This allows remote monitoring and control of aquarium systems, which many homeowners value highly and which facilitates professional maintenance and troubleshooting.All electrical work in equipment rooms should anticipate water exposure. While properly designed systems minimize leaks, equipment rooms should be treated as potentially wet locations with appropriate GFCI protection, waterproof enclosures for connections, and routing that keeps electrical components elevated above potential water accumulation. This isn’t just good practice—it’s often code-required for safety.HVAC Coordination and Climate Control
Professional equipment room installation showing HVAC and filtration coordination
Equipment Room Design and Location
Remote filtration systems require dedicated equipment rooms that must be planned during architectural design. These aren’t small closets—functional equipment rooms for large installations range from 50 to 200 square feet, depending on aquarium size and system complexity. Skimping on equipment room size creates maintenance headaches that compromise system performance and owner satisfaction.Location matters significantly. Equipment rooms should be within 20-30 feet of the aquarium to maintain efficient water circulation and minimize plumbing runs. Longer distances increase pump requirements, reduce efficiency, and complicate maintenance. Basements, garages, utility rooms, or dedicated mechanical spaces all work well. The key is providing convenient access for maintenance while keeping equipment out of primary living areas where noise and equipment visibility would be intrusive.Inside the equipment room, certain provisions are essential. Floor drains capable of handling high flow rates prevent water damage if equipment malfunctions or during maintenance procedures. Adequate electrical service—the 240V and 120V circuits discussed previously—must be distributed appropriately around the room for equipment placement. Lighting should be bright and comprehensive, as technicians need good visibility for maintenance work.Wall and ceiling finishes in equipment rooms should anticipate moisture. While properly functioning systems don’t create wet conditions, occasional splashing during maintenance is inevitable. Moisture-resistant finishes—perhaps tile, sealed concrete, or moisture-rated drywall with appropriate paint—are worthwhile investments. Ventilation prevents humidity buildup and extends equipment life.Access is often overlooked until installation day. Equipment rooms must be accessible for initial equipment delivery and for eventual equipment replacement. Large protein skimmers, filtration tanks, and pumps don’t fit through small doors or around tight corners. Standard 36″ doors are usually adequate, but the path from the delivery point to the equipment room should be verified during design. We’ve solved access problems with removable door jambs, temporary window removal, and other creative approaches, but planning adequate access from the start is far simpler.Access for Installation and Maintenance
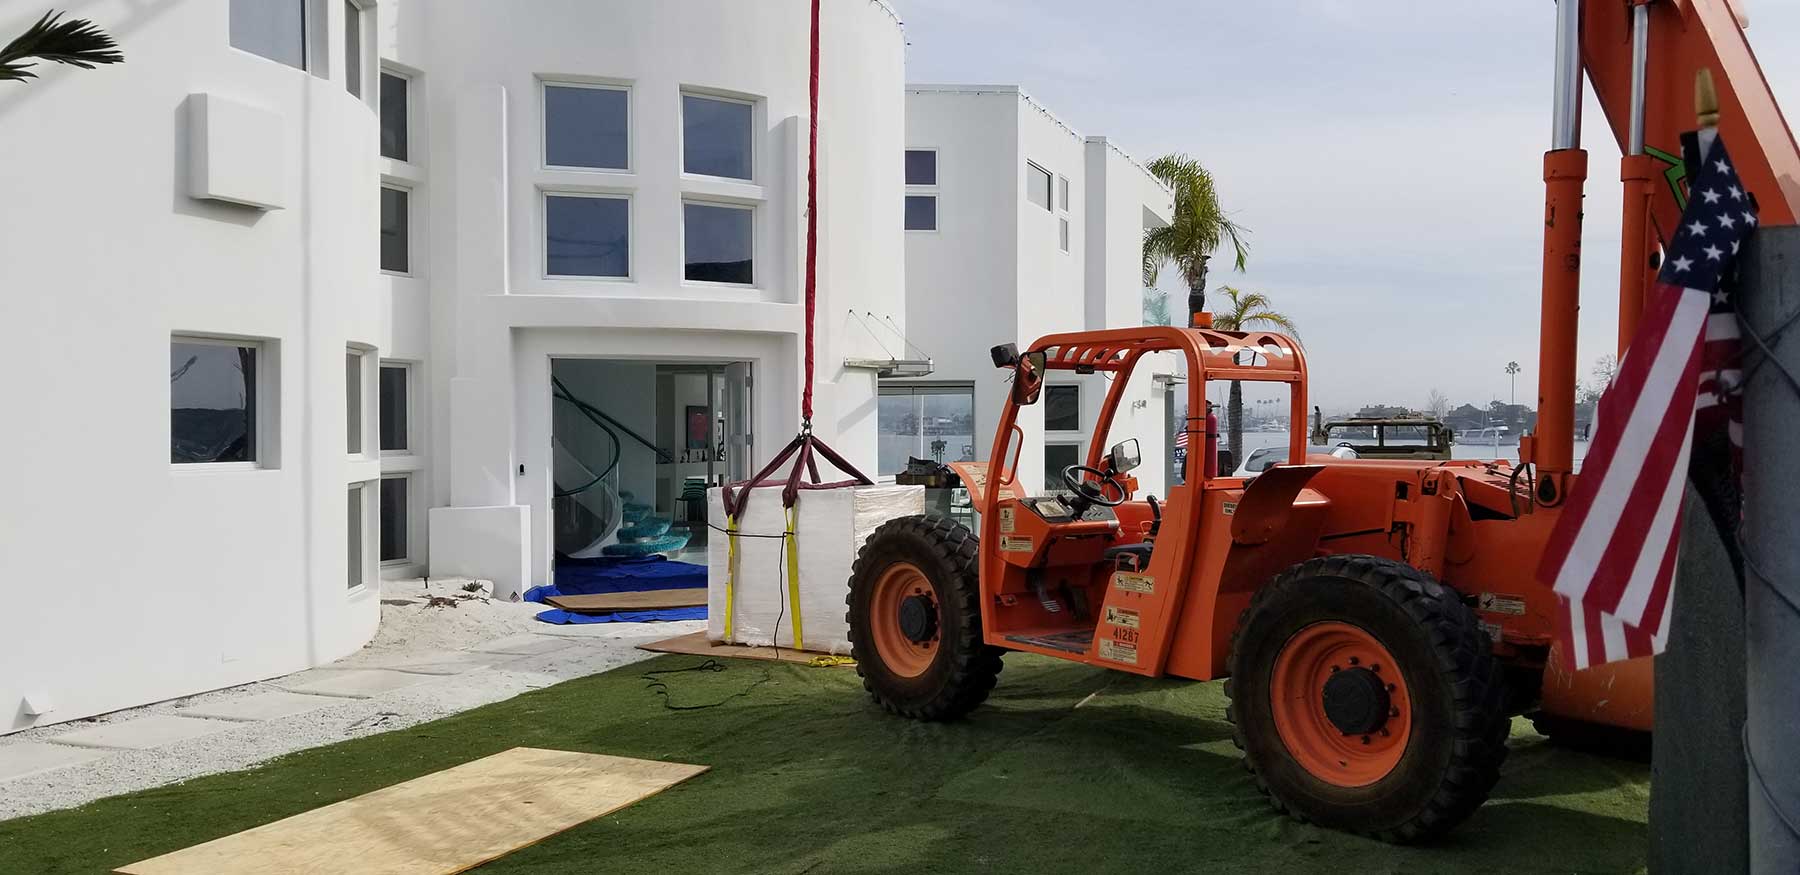
Crane installation providing efficient access for large aquarium systems
Code Requirements and Permitting
Custom aquarium installation intersects with building codes in several ways, though requirements vary by jurisdiction. Structural modifications to accommodate aquarium loads typically require permit review and engineering approval. If aquarium installation involves modifying the building envelope—such as using a crane to bring the tank through a window opening during construction—the building official needs to understand this is temporary access, not a permanent condition requiring unusual approval.Plumbing codes govern drain connections and water supply provisions. Equipment room drains must be sized and trapped according to local requirements. Backflow prevention may be required on fresh water supply lines to prevent any possibility of aquarium water contaminating potable water systems. These are standard plumbing considerations, but they should be addressed in permit documents.Electrical codes apply fully to aquarium installations. GFCI protection in potentially wet locations, appropriate conduit and connection methods, and adequate circuit sizing must all meet code requirements. Most jurisdictions are familiar with pool and spa electrical requirements, and aquarium systems are often treated similarly from a code perspective.In some jurisdictions, large aquariums trigger special permit requirements or inspections. This is most common in coastal California communities where water use or drainage policies might apply. We’re familiar with local requirements throughout Los Angeles and Orange County and can advise on any special permits or approvals needed for specific locations. Learn more about our design consultation process.Coordination with Other Trades and Systems

Professional coordination during aquarium installation phase
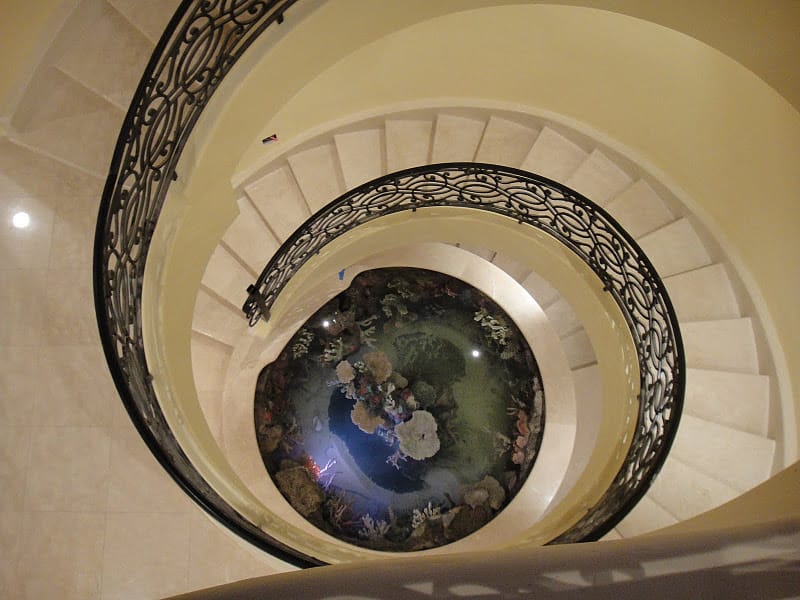
Finished installation demonstrating seamless technical and architectural integration